Showing posts with label free pattern. Show all posts

Friday, March 25, 2022

Choc Top Lollipop - Sweet Treats CAL chart

 Welcome to Week 9 of the Sweet Treats CAL.  -  a c2c blanket made up of squares featuring the designers' favourite treats! 


If you haven't seen the CAL so far, you can catch up over on our host's blog post at the stardust gold crochet blog. Click the pink banner below. A BIG thank you to Tasha who has put this whole blog hop together and all the other designers who made this possible. 


My chosen treat is a lollipop! I can't really say there was a specific reason I chose it: the idea was fully formed minutes after I heard that Tasha was looking for designers. I was very keen to join in with a bright, pop art-inspired image. 


This pattern is a chart only, and the blanket uses the mini c2c technique. However, as a chart, you can get creative and change the technique if you so choose! Keep scrolling for the chart!


If you would like the very detailed written instructions, along with all the other patterns, there is an option to purchase the eBook. Click below to be taken to my affiliate link. 


The CAL is sponsored by Wecrochet, and the yarn used is Brava Worsted.

My colours are Rouge, White, Sienna and Marina


The suggested hook size for this project is 5mm, but use whatever size gives you your ideal drape. 


And one more thing, if you would like to download a copy of the chart as a PDF, I have added one to my Ravelry Store. Please remember this is a chart only. The chart will remain here in this blog post, so downloading isn't essential, I just wanted to offer the option. Click the pink banner below to be taken to my Ravelry store to download the chart.


For more help and information, and links to the other squares in the CAL, please refer to Stardust crochet's post. 


I really hope you enjoy this pattern as much as I enjoyed designing it! 

Happy Crocheting,


Emma

Wednesday, March 16, 2022

Stop and Crunch the Roses - Assigned Pooling - Free Pattern


 If you've been yarning for a while, you'll most likely have come across the term 'planned pooling', this is where, based on stitch count and variegated yarns, you can create a pattern that appears in the colour changes - where the colours 'pool' together. You basically just crochet or knit - and a pattern forms.


A fairly new term I've come across (I actually heard about it after I had written this pattern) is Assigned Pooling, where the colour of the yarn dictates the stitch pattern. 

Here is a knitting pattern: POPing yarn Dictatorship that uses Assigned pooling (Ravelry Link) 

After designing the Fruit Cup Fade, I've been wanting to come up with a different way to use the colour variations in the Cicibebe yarn, and think I have come up with a fun idea. The pattern uses hdc and crunch stitch, and the colour variations look like little flowers, hence the name 'Stop, and Crunch Roses'. It's not written like a regular pattern, because instead of changing at fixed intervals, your yarn dictates the colour changes, which means every Crunch the Roses Shawl could be unique! 


Abbreviations Used 

slst  - slip stitch

hdc -  half double crochet


Special Stitch

Crunch Stitch: [slst in next st, hdc in next st] repeat to end of row.

• if you finish a crunch stitch row with a slst, start the next row with an hdc, and vice versa.


Pattern notes


Pattern change may occur in the middle of a row.

ch2 at beginning of each row does not count as a stitch.

ch2 at beginning of every row, even if you start with a slst


What you need: 

2- 3 balls of Cicibebe yarn (100g/ 360m) (2 will make you a short scarf of 150 cm length, 3 will give you a longer one!)  

If you can't find this yarn, try Heirloom Dazzle 8ply, or Hayfield Baby Blossom 8ply as alternatives.

OR - find a yarn with long colour changes that has approx 1/3 in a distinctive colour change. We are going to refer to this third as the Assigned Crunch Colour. A hand-dyed skein could be suitable. 

4 mm crochet hook or one to suit preferred drape,

Scissors, yarn needle.


Begin:

R1: Ch5, sk 1 ch, 4hdc, turn

R2: Ch2, 4hdc, turn.

R3: Ch2, 3hdc, (2hdc) in final st (5hdc)

R4: Ch2, 5hdc, turn.


Regular Pattern:

R5 and all odd rows: Ch2, hdc to final st, (2hdc) in final st, turn. (1 st inc),

R6 and all even rows: Ch2 hdc across, turn.


Continue this established pattern repeat until you reach the assigned crunch colour change.


then STOP!


and begin crunch stitch, keeping increases even.


Crunch Stitch: [slst in next st, hdc in next] repeat to end of row.

• if you finish a crunch stitch row with a slst, start the next row with an hdc, and vice versa.

Keep increases even means we continue the established pattern of increasing in the final st of odd rows, either (hdc, hdc), (slst, hdc) or (hdc, slst) depending on your personal sequence.


Then, when colour changes back, return to the established regular pattern.


Continue until 150cm or desired length

Fasten off and weave in ends.


Trouble shooting:

My yarn starts with the assigned crunch colour - what do I do?

A couple of options - Check both ends of the yarn, of both balls. If they both start and finish with the assigned crunch, you can cut the first section, or ignore the change until you reach the second set of assigned crunch. When starting your second ball, you may decide to cut and join the yarn to match up your colours.


Happy crocheting,


Emma 


Saturday, December 4, 2021

Op Shop Wristlets - and the golden loop

It's been a while since I posted over here. Turns out 2021 was not conducive to creativity (for me anyway) I keep reading that many people took up crochet and knitting, along with bread baking and other 'home' based crafts or skills, and I'm very pleased to hear it! I did knit myself a few socks (I have posted about which sock patterns I've liked as a beginner) but for some reason, my crocheting passion had left me. 


Anyway, for today, I have a last-minute Christmas gift idea - ideally for those in the Northern Hemisphere. A pair of wristlets (or fingerless gloves). They belong to a set I've had out for a while - The Op Shop Collection. The collection was first conceived back in 2015, and had had a couple of re-writes since then. The wristlets have been a bonus pattern included in the ebook, so I figured it was time to make them a little more available! 


The Original Op Shop piece


The Op Shop Collection includes a shawl, a headband, and this pair of wristlets. The wristlets are ideal for those who need some extra warmth, but still need their fingers free - to type, or swipe their phones! 

To get the full pattern set - a ebook is available on Ravelry  at this link 

The Op shop Shawl is available as an individual item on Etsy. 


the original Op Shop Wristlets from 2016 


The Op Shop Wristlets use a stitch I have called a Long Double Crochet, or an LDC - which is very much like a regular dc, but the first loop is pulled up to the height of the turning chain. The first loop is also referred to as the golden loop, and knowing about it can be revolutionary in making gauge. 

Esther from It's all in a Nutshell has a very detailed blog post about it, which you can find linked here. For what it's worth, I tend to have a short golden loop, but it may answer some questions about why some people use 3 chains for a turning chain with dc, and others only use 2. 

These wristlets were first published in 2016. ‘Op shop’ is short for Opportunity Shop, which is the Australian version of a Thrift store. The story is that I have a much-loved, thrifted bed jacket, and wanted to create a modern garment using it as inspiration. The original bed jacket is baby pink, and still in my possession! The pattern has been edited for clarity. 


Materials needed 

9mm hook 

Bulky weight yarn. (I used a small part of 1 x 100gram skein of Superfine Alpaca from Knitpicks) 

needle/scissors


Wristlets are made flat and seamed together. 


Abbreviations used 

ch- chain 

ch-sp - chain space 

sc- single crochet 

 LDC- long double crochet 

sk - skip

YO - Yarn over 

Do not count the chain as s stitch throughout the pattern. 


LDC- YO, hook in next st, YO, pull up loop to height of ch-5, (YO, pull through 2 loops) twice.


To make: 

Left hand  

Make a chain of 21 
Row 1- sk 1st chain, sc across (20), turn.
Row 2- ch 1, sc across (20), turn.
Row 3- ch 5, 20 LDC, turn.
Row 4- ch 1, 20 sc, turn.
Row 5- ch 5, 20 LDC, turn.
Row 6- ch 1, 1 sc. ch 4. sk next 4 stitches, 15 sc, turn.
Row 7- ch 1, 15sc, 4 sc into ch-sp, turn.
Row 8 - ch 1, 20 sc. 

Fasten off. Mattress stitch two short sides (edges) together and weave all ends in. 

Right Hand. 

Make a chain of 21
Row 1- sk 1st chain, sc across (20), turn.
Row 2- ch 1, sc across (20), turn.
Row 3- ch 5, 20 LDC, turn.
Row 4- ch 1 20 sc, turn.
Row 5- ch 5, 20 LDC, turn.
Row 6- ch 1, 15 sc. Skip next 4 stitches, 1 sc, turn.
Row 7- ch 1, 1 sc, 4 sc into chain space, 15 sc, turn.
Row 8 - ch 1, 20 sc. 

Fasten off. Mattress stitch two short sides (edges) together and weave all ends in. 


The current version of the Op Shop Shawl, which uses the LDC and can be part of a matching set.


I hope you enjoy this quick, and free pattern for fingerless gloves!


Happy Crocheting


Emma

Monday, August 2, 2021

Joshua Bonnet - free pattern - Pixie Bonnet


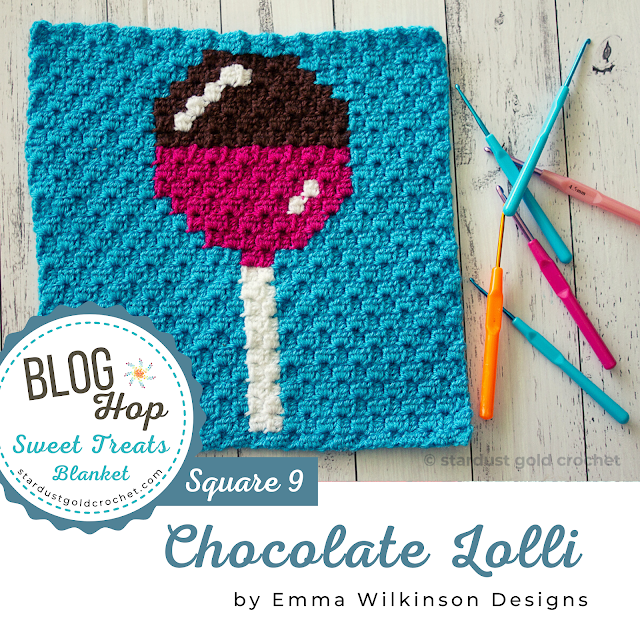
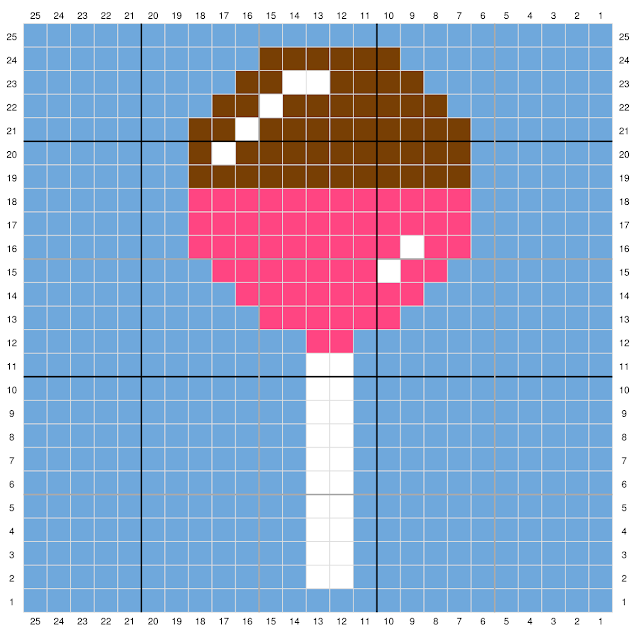
I first designed the Joshua Bonnet for my newborn son - Joshua! I love the look of bonnets on babies and wanted something that could be equally lovely for girls and boys. Joshua and the Joshua Bonnet are now over five years old, so time for a refresh of the pattern!

The pixie bonnet features some detailing along the front to frame the face.


Sizes: Newborn (Head circumference) 14 inches/35.5cm (3-6 month 16 inches/40.5 cm, 6-9 month 18/46 cm, 9-12 month 19 inches/ 48 cm, 2-5 years 20 inches/ 51 cm, 5-8 years 22 inches/ 56 cm.)


Yarn: 8ply/DK weight, 100g/3.53oz (283 m/309 yards) 52 m/56 yards (MC), 26m/23 yards A and B
Hook: US I (5.50mm) and US G (4.0mm)
Notions: Scissors, Yarn needle.
Gauge: 12 sts and 8 rows = 4" (10 cm) in hdc. 

Abbreviations: (US terms used) 

ch = chain

sc = single crochet

hdc = half double crochet

st(s) = stitch(es)

sl st = slip stitch

rep = repeat 


Pattern Notes: Turning chains do not count as a stitch.

The hat is worked flat in rows, and seamed along the back.


Using MC and 5.5 mm hook:

Chain 39. (41, 48, 51, 54, 59)

Row 1: Skip 1st ch, 38 (40, 47, 50, 53, 58) sc, turn.

Row 2: Ch 2, 38 (40, 47, 50, 53, 58) hdc, fasten off, turn.

Row 3: Using A, ch 1, 38 (40, 47, 50, 53, 58) sc, fasten off, turn.

Rows 4 - 8: Alternate rows 2 and 3

Rows 9 - 19 (20, 22, 24, 26, 28): in MC, As Row 2

Fasten off and weave in ends. 


Surface Crochet:

Using B and 4.0mm hook, RS facing out, surface slip stitch along Row 4, and repeat on Row 6.
Repeat with MC along the foundation chain.


Method:

Insert hook through space between first two stitches, front to back; keeping working yarn on
WS. Pull up a loop, insert hook into next sp (between stitches) pull up loop through space, and loop on
hook (one loop remains on hook). Continue to final st, cut or break yarn, bring remaining yarn through loop, and back to WS to secure the final loop.

Weave in ends.


Finishing:

Fold bonnet in half lengthways, so point a meets point b (above image) with WS together seam this edge together using your preferred joining method. This seam will be the back of the bonnet. Fasten off and weave in ends. 


Chin Tie:

Chin tie is worked in a continuous piece without cutting the yarn. Starting with one tie, then continuing around the base of the bonnet (back of the neck), and then continuing with the second tie.

Using MC, and 5.5 mm hook

Ch: 25 (29, 33, 37, 41, 46)

Skip 1st ch, sc across. Join to the left front corner of the bonnet with a sl st, sc across base of the bonnet, working one sc into the side of each row. Ch: 25 (29, 33, 37, 41, 46) Skip 1st ch, sc across, sl st to the bonnet.

Fasten off and weave in ends. 


 Happy Crocheting!


Let me know in the comments if you would like a tutorial on surface crochet, or on something else that's come up in the pattern.

Emma xx

Saturday, July 3, 2021

Textured Clutch "Amelia Clutch" Free Pattern

The Amelia Clutch is a chunky textured clutch that can be used to transport your crochet hooks and small projects, or maybe your phone and keys! Made with ‘ribbon tape’ using recycled textiles, it works up in no time at all. This clutch is also lined with fabric (which is optional) 


Above, shown in a tape yarn.


Above, shown in a 'rope' yarn


This pattern featured in the Get the Summer Vibes Blog Hop


Pattern Notes:

Clutch is made flat and sewn together. Due to the thick nature of the yarn, it is recommended to use cotton thread to seam the sides. Use leftover yarn to create a tassel or other embellishment.


Like this pattern? You might also like the Moss Stitch Pouch!


Finished Measurements:

Width: 19 cm

Height: 10 cm

Materials:

Yarn: Hoooked Ribbon XL (80% Cotton, 20% Other; 72yrds/125g) 0.5 x ball used.

Hook: 12 mm

Notions: cotton thread to sew side seams in MC, sewing needle

To line: 20 x 20 cm of fabric, cotton thread, sewing needle, (sewing machine can be used) 

Optional: zipper (18 cm), beads to trim.

Gauge: 9 sts and 12 rows = 4" (10cm) in bag pattern.  


Chain 18.

Row 1: Sl st in 2nd ch from hook, *hdc in next ch, sl st in next ch; rep from * across, turn. (17 sts)

Row 2:  Ch 1, *hdc in first sl st, sl st in next hdc, rep from * across, turn.

Row 3: Ch 1, *sl st in first hdc, hdc in next sl st, rep from * across, turn.

Row 4- 16: Repeat alternating Rows 2 and 3.

Row 17: sl st into each st across.

Fasten Off.

Finishing:

Fold in half, lengthways, sew side seams with cotton thread. 


Example of tape yarn. 


To line:

Fold the fabric in half lengthwise, (RS together) Hem top edges by folding over 0.5 cm to WS, and pin in place, and sew (with either sewing machine, or hand sew)

Pin side seams and sew on WS.

Pin zipper and lining in place in the clutch, zipper between ling and outer, and sew in place along the top hem. 


Abbreviations (US terminology):

ch = chain

sl st = slip stitch

hdc = half double crochet

st(s) = stitch(es)

rep = repeat

RS = right side

WS = wrong side


Amelia Clutch is also featured in the digital magazine 'I Like Crochet' 


Happy Crocheting


Emma


Monday, April 26, 2021

Unity Remixes and an Update

If you've been reading my blog for a while, you'll know about the Unity CAL that started in February.


The 2021 Unity CAL was created by 10 Australian designers and was sponsored by the Australian Crochet Community and KoKonki - Motki Ombre.


Here is my blanket, completed to part 4, and below - my finished blanket on display at the Sydney Royal Easter Show - I won the blue ribbon! 


The CAL has now finished but, like Harmony,  the 2019 ACC CAL, there is a Unity Remix & Extension.

Unity CAL remixes can be made by using:

  • The released parts in a different order
  • Blocks of the different parts to make a block afghan
  • Blocks or parts to make different products altogether.


The blocks are now available on Ravelry, as stand-alone patterns, that can be combined in any way you choose- make a simple 3x3 square blanket, or make multiples of the squares like Jane Rawnsley-Kinney did for her test of the patterns, or if there is one square that you just love, why not make a whole blanket of just that! 

This link will take you to Ravelry to view all the patterns in the series.


This link also includes the original CAL sections!


 Need help with the stitches from my block? you can find the tutorial for extended front post stitches here, and a tutorial for the hdc join here. 


As always, Happy Crocheting,


Emma. 


Monday, March 15, 2021

Crochet Squares Round Up - plus DK yarn recommendations

 The 'Sol Square' is proving to be very popular, so I thought I would do a round-up of all the squares I currently have on offer. This post does contain affiliate links

Some of these squares match, some don't! Some could be modified slightly to fit with others, by adding or subtracting a row or two. That's the beauty of crochet - make it your own!

The Sol Square has been made in a worsted weight yarn, but all the others are in a DK - which is my go-to yarn. There's no reason the Sol Square can't be made in DK either - it'll just work out a little smaller. I've included a few recommendations with links - which can also be helpful for yarn substitution. If you are Australian, you might think of DK as 8ply. It can also be classified as #3 Light.

Coboo - A cotton bamboo blend that comes in 18 colours, and is beautifully soft and light. 


Mandala Yarn - An Acrylic yarn  that comes in many gradients 

Ice Cream Yarn - a soft Acrylic yarn in 12 colours ideal for baby and kids. Icecream is very similar to Mandala, but the colours repeat throughout. 


Paintbox Yarns Cotton DK - available in 56 shades

Paintbox Simply DK - available in 49 shades


And now for the squares: 


First up - the Sol Square. This one is part of the Friendship CAL and you can find the post here.
Let me know if you've made one already! 


Nebula Square is a bit smaller and simpler - but can be used to create a beautiful effect using variegated yarn - like Lionbrand Ice cream! 


Berirlee Square - Yes, I am a little bit obsessed with squares that start with a circle! 


the 'Big Circle Grannies' were first made to meet a donation request.


Celestial Square work with the Nebula Square, to create a little bit of texture. 


Dahlia Pinnata is a beautiful floral square. 


Good Old Grannies - if you want to go down the classic route. 


Thank you for reading,

Happy Crocheting!


Emma


Tuesday, March 2, 2021

Moss Stitch Pouch - Free Pattern


This pattern has been available as a free download on Ravelry for some time. This year I'm giving some things a refresh, which means bringing some more free patterns to my blog. 


This one is a chunky textured pouch, that can be used to transport your crochet hooks and small projects, or maybe your phone, keys or make-up! Made with a soft cotton rope, it works up in no time at all.  Great for a beginner; written in US terms.


I love working with recycled textiles. For one reason, it's great to use a material that might otherwise go to a landfill - and there is nothing wrong with it! And it also provides a beautiful texture, it's chunky - and makes really quick and unique products. If you can't find the cotton rope yarn a t-shirt yarn or ribbon yarn makes a good substitute. (Shown below in 'ribbon' yarn')


Moss stitch is one of my favourite stitches - it works up fast, looks great, and only uses chains and single crochet (UK double crochet) I've also seen it referred to as linen stitch. You may like to also check the Neverending Story Shawl if you like Moss Stitch! It's a great stitch for beginners and a favourite sitch for established crocheters. 


Finished Measurements:

Width: 19 cm

Height: 10 cm


Materials:

Yarn: Cotton Rope (Macrame cord) 250 g, 90m  

Yarn alternative: Hoooked Ribbon XL (80% Cotton,20% Other; 72yrds/125g) 0.5 x ball used.

Hook: 12 mm

Notions: cotton thread to sew side seams, sewing needle

To line: 20 x 20 cm of fabric, cotton thread, sewing needle, (sewing machine can be used) optional buttons or fastenings

Gauge: 9 sts and 12 rows = 4" (10cm) in moss stitch


Use leftover yarn to create a tassel or other embellishment
 

Abbreviations (US terminology):
ch = chain
sc = single crochet
sk = skip
sp = space
st(s) = stitch(es)
rep = repeat


Chain 18.

Row 1: Miss 3 ch, *sc, ch, sk st, rep from * finishing with sc in last ch, turn. (8sc)
Row 2:  Ch 2, *sc into ch sp, ch 1, rep from * finishing with sc in final ch sp.
Repeat row 2 for pattern.
Complete 25 rows.
Without cutting yarn, ch 23 and sl st to 1st ch to make wrist strap.


Finishing:
Fold into thirds, lengthwise. Fold end row (wrist strap) in, foundation chain end will fold over top. 
Sew side seams with cotton thread.
Add buttons or fastenings. Foundation chain spaces make perfect buttonholes.
To line:
Fold the fabric in half lengthwise, (RS together) Hem top edges by folding over 0.5 cm to WS, and pin in place, and sew (with either sewing machine, or hand sew)
Pin side seams and sew on WS. Pin lining in place in clutch, and sew in place along the top hem.